As I mentioned in an earlier post, On Building, Buying, or Recycling a Computer to Run Ubuntu Linux, you have several options in acquiring the hardware to install and run Ubuntu Linux.
In brief, this is a “make or buy” decision. Should you buy a computer that someone else built or make your own computer, either by refurbishing an older one or building a new one from scratch?
It’s not that hard to build a computer these days. It is fun and you can usually build one for less cost than buying one from a manufacturer or dealer. It can also be a educational experience.
Part of the savings comes from not having to pay the “Windows tax,” the part of the manufacturer’s cost that consists of Windows licensing fees that must be sent to Microsoft’s coffers. You can also find better deals on used machines if you look for machines that don’t come with Windows, as fewer people will be interested in them.
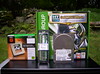
Here’s a report on my recent experience building a computer from scratch based on the ECS GeForce 6100SM-M motherboard. Here are some pictures to start things off:


You want you use components that are known to work well with Ubuntu. As I noted in my earlier post to build a computer you need:
- A case;
- A power supply for the case;
- At least one fan to cool the power supply and other components inside the case;
- A motherboard;
- A processor chip to connect to the motherboard;
- One of more memory chips, also known as “memory sticks”;
- A cooling system for the processor, usually in the form of a fan;
- A hard drive;
- An optical drive, either a cd-rom drive or, more usually these days, a combined dvd/cd-rom drive;
- A video chipset on the motherboard or a separate video/graphics card to power the monitor.
Once you have these components, you also need a monitor, a keyboard and a mouse to make a complete system. I won’t say any more about these as these tend to always work with Ubuntu; for example, you don’t need a special Ubuntu keyboard. I also won’t say more about the optical drive, as recent models tend to always work on Ubuntu.
Sometimes components come be purchased as a single component that combines several of the above components. For example, you can buy a case that come with a power supply and cooling fan, or you can buy the “retail” form of a processor, which incudes the processor chip; a cooling system, usually in the form of a fan; and a special past that you need to attach the fan to the processor. Or you can buy a motherboard with built-in video support.
I always favor buying these larger components as this is more cost effective.
I also buy my parts from one of my favorite companies, Newegg.com. I wrote the post On Buying and Building Hardware: Break a Leg with Newegg to share some of the lessons I have learned in over three years as a satisfied Newegg customer.
I decided a few weeks back to build a new computer from scratch. It was a spur of the moment thing in that I didn’t really need another computer, but I also wanted to perform the experiment of seeing how much it would cost to build a decent desktop with currently available component technology.
I made several decisions before exploring Newegg to decide just which components to buy.
I didn’t want to be as cheap as possible, but as cheap as made sense. My experience over the years has been that is is most effect by something at the level just above the cheapest. For example, when I bought a house I had to buy things like plumbing tools, shovels, rakes, lawn mowers and so forth. I have most of them over twenty years later. The ones that I don’t are the ones that I paid too little for, so when they broke and I had to replace them I bought high quality. For example, I have bought damn good rakes, shovels, and driveway brooms.
I wanted a case that included a fan and a power supply. I wasn’t seeking very high performance and wasn’t building this computer to run games; hence I knew that I didn’t need a large power supply or more than one fan.
I wanted to use an AMD processor. I have found AMD processors to be more cost effective, and I had good luck with a machine I built back in May 2004 that I have since refurbished to run Ubuntu Linux (I’ll report on that experience in a forthcoming post).
I then knew I wanted to buy that AMD processor in “Retail” form, which means you get the processor, the fan, and the thermal compound (a paste-like substance) that you need to attach the fan to the processor.
This, by the way, is an important lesson. When I built my first machine I bought an “OEM” processor since it was cheaper. Once it arrived and I started to assemble the machine I realized I needed a fan, so I had to spend the money for that and wait a few days for it to arrive. Then I realized I needed some thermal compound. To add insult to injury, that thermal compound cost about ten dollars, five for the compound and another five dollars to ship the little tube it came in, a tube that weighed much less than an ounce, and I need only a few drops of that compound. Keep it simple — always buy “Retail” processors.
I decided to use the most commonly-used technology. That is, whenever I had a choice of technologies, I would choose the technology with the most options. For example, if you look at Newegg’s list of AMD processors, you will find that the largest number of available processors have “AM2” as their “CPU Socket Type.”
I also knew that the key component would be the motherboard. This is the traffic cop, the “computer within the computer, ” that ties all the other components together. It links the memory chips to the processor chip, the hard drive to the hardware bus, the keyboard to the processor, and so forth.
Once you have settled on the processor type and the socket type, you then have to pick a motherboard. This decision choice determines what kind of memory you will need, the number of additional hard drives and plugin cards that can be attached, and so on.
I also wanted a motherboard with a built-in video chipset that was known to work well with Ubuntu and that supported 1280×1024 monitors, as these are the most cost-effective monitors available today.
And of course I wanted a motherboard that was known to support Ubuntu, one that was so easy to use that a number of Newegg customers had posted comments about their success. I also wanted a motherboard that more than a few customer comments, in part because Ubuntu is still such a small share of the total market that I couldn’t expect to get any useful information about Ubuntu for a product with just a few tens of user comments.
I also decided to limit my costs, and have some fun in the process, I decided use only components available from Newegg with “free shipping.” Newegg charges at least $5 to ship most components, and $15 or more for components you can’t hold in your hand, such as cases and monitors. But Newegg offers various specials, including some components with free shipping, and also “combo deals” in which you get a discount by buying two related components at the same time, such as a motherboard and processor.
I thus knew I needed an motherboard that supported AMD Socket AM2. Since I also wanted a built-in video chipset, I did a little web investigation and found favorable mention of the Nvidia GeForce 6100, so I then looked for a motherboard with that video chipset.
Here are some of the customer comments on Ubuntu and the ECS GeForce6100SM-M (1.0) AM2 NVIDIA GeForce 6100S Micro ATX AMD Motherboard – Retail, $50:
- “Have been running Ubuntu 7.04 on this board for several months now without any problems. Integrated graphics works surprisingly well.”
- “I paired this with an Athlon 64 X2 3600+ and 2 GB Transcend DDR2 800. Running with Linux kernel 2.6.20 and Kubuntu 7 for amd64. Everything works perfectly. A fine choice for a low-cost Linux workstation.”
- “Running Ubuntu on this thing, with an X2 3600+ and a 1 gig stick of OCS Gold DDR2 800. Seems quick and solid.”
- “Good price and it didn’t take a lot of tweaking to get it to work properly with the DVD/SATA/IDE drives. Seems most on-board hardware is supported by Ubuntu 7.04 by default.”
- “I wanted a quality and inexpensive mobo to build my first computer. I’m glad I got this bundled with the Sempron 3000+. I have it running Ubuntu 7.04 with Beryl! I just needed to install the Nvidia drivers to get Beryl to run but so far everything has been stable, I’m extremely satisfied with what I got.”
That was good enough for me, so this motherboard was the first thing I put in my shopping cart. After reading the motherboard specifications I did a little research and then added these components to my shopping cart:
AMD Athlon 64 3000+ Orleans 1.8GHz 512KB L2 Cache Socket AM2 Processor – Retail, $42.
Kingston 1GB 240-Pin DDR2 SDRAM DDR2 667 (PC2 5300) Desktop Memory – Retail, $40.
Next came the hard drive. You can get a good one for about $50, but for not that much more you can go to 250GB:
Western Digital Caviar SE16 WD2500KS 250GB 7200 RPM 16MB Cache SATA 3.0Gb/s Hard Drive – OEM, $65.
The case?
Rosewill R604TSB-N 120mm Fan ATX Mid Tower Computer Case+450W Power Supply – Retail, $60.
If you haven’t built your own machine before and are hesitant, I suggest you take a look at the motherboard manual. For this machine it can be found at GeForce6100SM-M (V1.0) Manufacturer’s site. If you find interesting to read it then steam on. If you don’t then go find your hardware to run Ubuntu another way.
Once the components arrived, it took only a few hours to assemble. Experienced builders can do it in much less than an hour, but I wanted to prolong the fun and so took my time.
Here are a few thoughts on on assembling the system. You can find lots of resources on the web about how to build your own computer. I’m mainly writing this to shows it’s not that hard and to report on a particular list of components that worked for me.
- Open up the case.
- Do NOT connect any AC power cord to the case until instructed to do so.
- Attach the motherboard to the case using the supplied screws. Don’t force anything.
- The motherboard comes with a small panel that you need to insert in the back of the case. This is where you will connect the display, the mouse, and so on. If the case comes with such a panel then discard it. Be sure to use the panel that comes with the motherboard.
- Insert the processor in its socket. There’s usually a lever to lock it into place.
- Spread the thermal compound on the top of the processor. You don’t need much. If you are using the compound that comes with a “retail” processor you can use all of it. Otherwise you want just enough to cover the top of the processor with a thin film.
- Mount the processor fan on top of the processor, and lock it in place.
- Insert the memory chip(s). There’s only one way to do it, so don’t force anything.
- Connect the processor fan’s cable to the motherboard.
- Connect all the other cables in the case to the motherboard. Follow the diagrams in the motherboard manual. Be sure to connect the cable for the case fan and power supply.
- Install the hard drive and the optical drive, connecting their cables to the motherboard.
- Leaving the case open, connect the cables for the monitor, mouse, keyboard, and internet (ethernet) to the appropriate slots in the rear of the case, in the small panel you installed in step (4).
Take a break. Once you’re rested it’s time to power up your new baby.
Leave the case open. Inside it you should now have a case fan, a processor fan, and perhaps another fan on the motherboard. You may have additional fans on the case.
You want the case open and you want to be looking at fans, most importantly the fan on top of the processor chip, when you first power up the machine. Connect the power cable from a wall socket to the case. The machine may start. If it doesn’t then press the power switch.
If you don’t see the processor fan spinning then immediately shut down the power. A processor can operate for only a few minutes without cooling else it will be destroyed.
Don’t continue until you know all the fans are operational.
A good way to test a new machine is to use a “live” cd. I tried the standard Ubuntu install disk in this way.
Wouldn’t you know it? The box worked right off the bat, so I just steamed on and did a full Ubuntu install. Installing Ubuntu is not hard; you are given lots of guidance.
That machine has been solid as a rock since I first powered it up. It’s name on my home network is “fs,” not “fs” for “file server,” but “fs” for “free shipping.”
It is also quiet. By the way, if noise is a real issue to you, then pay the bucks and go with an Antec “Sonata” case. When I built my first machine I used a cheapo case that came with a fan that made me feel like I was in a wind tunnel. I threw it out and, after some research, bought a Sonata. However, this machine is almost as quiet as my older one with the Sonata case.
This is not a toy system. It is more than adequate for every day desktop use, even if you are a developer. It has 1GB of memory and a 250GB SATA hard drive with a built-in NVIDIA GeForce 6100 video chipset that supports 1280×1024 resolution very well.
The case is good but not great. I found it hard to work with the little plastic knobs that you are supposed to able to tighten components in place without having to use a screwdrive, so I used a screwdriver to unscrew and then discard the knobs, and then to screw the components into place.
In summary you can build a complete computer from scratch that can run Ubuntu for about $250. This doesn’t count the cost of the monitor and the optical drive. You can get both for about $200, bringing the total cost up to $450. You’ll have a computer that is not a toy, not a slouch, but a serious desktop machine.
It’s worth noting that while you may find manufactured systems for less cost, this system has a 250GB drive and high-quality components. The components you can get from Newegg tend to be of higher quality than the commodity components used by manufacturers, so you can expect a more reliable and trouble-free system if you “roll your own.”
Not only can you save money, but you will have the satisfaction of using something you put together with your own hands. Doing so gave me confidence, as it will you.

 Tuxer's
 Welcome
12 Comments
This is the ACER T180-3xx/4xx Line of pre-assembled AMD machines. ACER makes its own board which is has the firewire, 4 memory stick sockets 4 Sata connectors and E10/100/1000(Marvel) off the same shrink wrapped Nvidia 6100-405 design. For the SuSE lovers amoung you the sound does not work until you use alsa 1.14A since kernel does not support the realtek codec on the ECS board until 2.6.19 but the ACER uses the 7.1 codec which is supported on intel_snd.
All said and done FRY’S runs an ad with this board and AMD processors each week.
So my 6000+ x2 cost $350 in a Antec Aria with 500G Sata and 2 sticks 1 gig so bus runs in HT2000. (1 stick is 1/2 speed)
Hey that was a ratrher nice blog. I know how you feel putting it together yourself. The first computer I ever owned was a Packard Hell with a DX2 66 mhz Pentium 1. Bought it for an ungodly 2400.00 minus the 15″ CRT monitor @ Computer City (now CompUSA) I was able to get an Evergreen (AMD!) overdrive processor that instantly made it an 133mhz about 2 years later. Eventually the Matsushita drive failed, the 2400 baud modem and onboard video all failed. I learned later they wre reconditioned parts! Packard Hell was the worst customer service I ever experienced. They literally gave me no choice but to build my first PC in 1998. I switched to Ubuntu about 5 months ago.I bought Redhat Linux 4.0 in 1998 but it was such a steep learning curve. The GUI was not yet perfected and driver support was nil. Plus the manual was actually a book (I Stll have it for some reason). But Linux changed a lot since 1998.
I just lost my an8 32x SLI mobo to a real bad brownout. The 12v power failed. The board is useless now. I’m back to an older board from a few years ago just so I can search for the parts I need online. I’m going with Abit again because they make good boards & work with Linux, I’ve decided on the KN9 SLI with Bios rev 2.0 because I know someday Linux as a whole will be able to run Windows games not just through a program like Cedega, but natively. Plus purely aesthetic speaking, I love the orangish PCB that will look nice with bronze colored OCZ ram and the copper CPU fan from Zalman. So to make a long story short, congrats on building this rig. I also dig the purple board. TYAN is the most boring board maker I know of (my 1998 build). ECS has style. Keep them colors coming. I’m also looking forward to Gutsy Gibbon :o]
I bought the combo at Frys. It comes with a brisbane 2300, which is a very efficient cpu. I bought a COOLER MASTER GeminII heat sink and used arctic silver 5. It stays cool without a cpu fan. All I have is a scythe case fan, and the system is so quiet, I accidently leave it on sometimes.
Thanks for these awesome instructions! I used them to build my first ever computer and install Ubuntu. I used the same components since I was concerned about OS compatibility with the hardware. When I turned mine on, I got nothing more than a ‘beep, beep, beep, etc’ from the mobo. I took out the memory and snapped it back in. Voila!! I installed Ubuntu this morning, and then had to go to bed. Again, thanks. You really helped this newbie.
Thanks so much for your blog about this. I’ve been wanting to do something like this for a number of years now. Your blog was a huge help to me. I followed you parts list pretty closely, with a few mods. This was my first build.
The only issue I have is, I can’t get a mic to work, using either the front or rear ports. I usually struggle a bit with this in Ubuntu, but after tweaking all of the audio settings I’m always successful. Not this time. I even tried reseating the connections, but no luck. Any thoughts? I’m guessing I’ll need to get a soundcard. Any suggestions?
Again, thanks for taking the time to post this blog. It really was a huge help.
Here’s my parts list (all from newegg.com & Micro Center):
RAIDMAX – SAGITTA ATX-921WB Black SECC Steel ATX Mid Tower Computer Case
AMD – Athlon 64 Processor 3200+ with HyperTransport Technology
ECS – GeForce6100SM-M2 (1.0A) nForce 405 AM2 mATX Motherboard
Pioneer Electronics – DVR-2810B 10x Dual/Double Layer DVD±RW Burner SATA
Kingston – 2GB (2 x 1GB) 240-Pin DDR2 SDRAM DDR2 800 (PC2 6400) Dual Channel Kit Desktop Memory
NZXT – PRC-550W-AP ATX 12V V2.01 550W Power Supply 115/230 V UL, CSA, TUV, CE, FCC
Western Digital – Caviar SE16 WD2500KS 250GB 7200 RPM 16MB Cache SATA 3.0Gb/s Hard Drive
SABRENT – CRW-UINB 65-in-1 USB 2.0 Internal Card Reader w/ USB 2.0 Port supports SDHC/VISTA
I have just purchased the same motherboard as part of a bundle. Anyway I have got as far as instailling the mobo into my case put am stuck at what way round the contectors go for the on switch, reset switch and leds. Can’t make head nor tails of the picture in the book. Is there anycgance you could show us how to do it in a video?
I just did a very similar buildout but using the ECS Geforce6100SM-M2 board. Not sure what the difference is between the two boards but I can tell you it was a big mistake for me. Neither Ubuntu nor PClinuxOS could detect a sound device after repeated installs. Ditto for Win XP. Same thing after running the manufacturer supplied CD which only runs under Windows and only seems to deal with graphics anyway. Turns out ECS does have a download for Windows only but I haven’t tried it yet. Seems like linux is S.O.L. with ECS.
I’ve got the GeForce6100SM-M2 too and the audio worked at first, but as soon as my folks got it home (out of state) the sound stopped working.
Hi David,
I’m a graduate student and I wanted to let you know that I really appreciated your post, “WordPress gave me a blog to see how I was going to handle it
Building your own Linux Ubuntu computer using the ECS GeForce 6100SM-M motherboard” but noticed that most of the parts are no longer available on newegg.com.
I am trying to build my own computer but know of no one that can help me choose parts. I was wondering if you could possibly update your blog with more current parts?
I would greatly appreciate your suggestions on parts to buy that would give me a system that would perform in a similar price range as the one you posted.. or at least maybe what cpu and mother board combo you would suggest for an ubuntu system?
Yeah, I second the updated parts list. It would be great to know as I would like to do the same thing you did.
– Thanks
Thanks for this guide, What CPU will I need to purchase for this system ??
Whatever works with the motherboard.
7 Trackbacks
[…] read more | digg story […]
[…] Building your own Linux Fedora computer using the ECS GeForce 6100SM-Motherboard Posted in open-source, xo-laptop by daveshields on December 10th, 2007 I wrote a piece in September, 2007, about building your own Ubuntu computer, Building your own Linux Ubuntu computer using the ECS GeForce 6100SM-M motherboard. […]
[…] Building your own Linux Fedora computer using the ECS GeForce 6100SM-M motherboard Posted in open-source by daveshields on January 8th, 2008 I wrote a post back in September about how to build your own Linux computer, Building your own Linux Ubuntu computer using the ECS GeForce 6100SM-M motherboard. […]
[…] a comment » I start my working day by booting up my Ubuntu box. [1] It takes less than three minutes from the time I press the power switch to having a […]
[…] Building your own Linux Ubuntu computer 13,251 […]
[…] Building your own Linux Ubuntu computer using the ECS GeForce 6100SM-M motherboard for instruction on how to build your own computer. […]
[…] Building your own Linux Ubuntu computer using the ECS GeForce 6100SM-M motherboard for instruction on how to build your own computer. […]